Print barcode labels with the generator
This example shows how easy it is to print labels with barcodes. You can specify the position and size of both the labels and the barcodes in millimeters.
First launch the ActiveBarcode Generator and create the barcode you require.

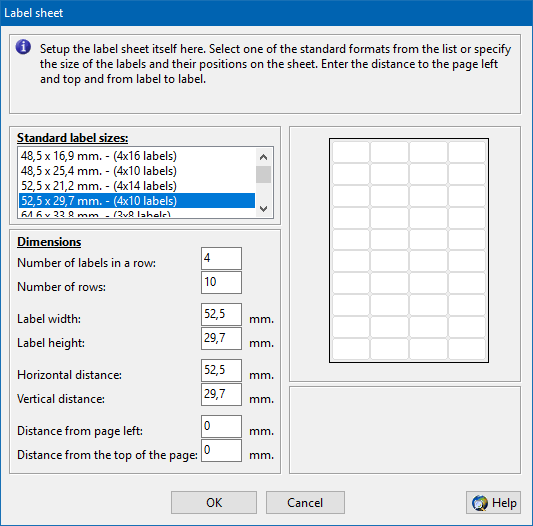
Select the required label sheet definition from the list of predefined labels sheets. If the sheet you need is not available in this list continue with setting up the label sheet for yourself:
Enter the required dimensions of the labels in millimeters. Take a look at the image on the right of the dialog to see what values are required. Please note that some label sheets have no unused borders. In this case you enter simply 0 for them.
After entering all data correctly, press the Ok button.

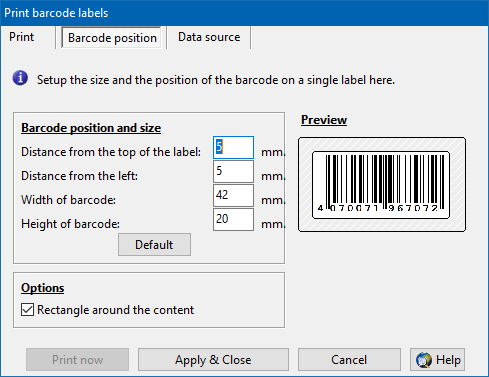
Use a ruler to measure the exact position and size of the area where the barcode will be printed. You need 4 values:
After entering all data correctly, go back to the Print tab.
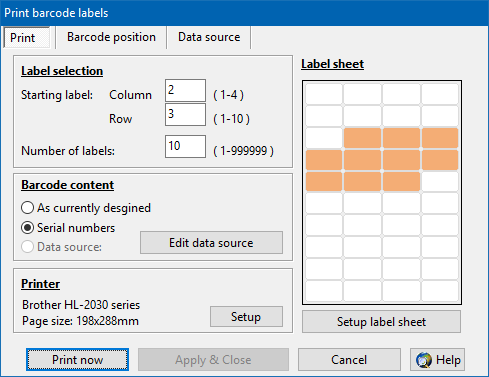
Now select what labels you want to print. The following dialog will show up:
First, select the label you want to start printing with by entering its row and column. Then specify how many labels you want to print. The graphic on the right will visually display the labels you have selected.
There are print options available:
As currently designed:
The barcode you currently have designed inside the ActiveBarcode Generator will be printed.
Serial numbers:
Using this option you can create labels with serial numbers starting the current barcodes text. This option is only available if serial numbers are possible with the current barcode text setting, e.g. is must be numeric.
Data Source:
You can use the Data Source to import data.
Example of using the data source
Finally press the Print now button and the barcode labels will be printed.
1
First launch the ActiveBarcode Generator and create the barcode you require.
2
Setting up the label sheet
To setup the dimensions of the labels and the label sheet, first select the function Setup Label sheet.. of the menu Print. The following dialog will show up:
3
Select the required label sheet definition from the list of predefined labels sheets. If the sheet you need is not available in this list continue with setting up the label sheet for yourself:
Enter the required dimensions of the labels in millimeters. Take a look at the image on the right of the dialog to see what values are required. Please note that some label sheets have no unused borders. In this case you enter simply 0 for them.
After entering all data correctly, press the Ok button.
4
Print the labels
Select the function Labels.. of the menu Print. You can specify the size and the position of the barcode on the label. If you want to do this, click on the tab Barcode Position. The following dialog will show up:
5
Use a ruler to measure the exact position and size of the area where the barcode will be printed. You need 4 values:
- Distance from the top of the label
- Distance from the left of the label
- Width of the barcode
- Height of the barcode
After entering all data correctly, go back to the Print tab.
6
Now select what labels you want to print. The following dialog will show up:

First, select the label you want to start printing with by entering its row and column. Then specify how many labels you want to print. The graphic on the right will visually display the labels you have selected.
There are print options available:
As currently designed:
The barcode you currently have designed inside the ActiveBarcode Generator will be printed.
Serial numbers:
Using this option you can create labels with serial numbers starting the current barcodes text. This option is only available if serial numbers are possible with the current barcode text setting, e.g. is must be numeric.
Data Source:
You can use the Data Source to import data.
Example of using the data source
Finally press the Print now button and the barcode labels will be printed.


